2. Add Camera Info
Configure cameras for each room
Written By Daniel Gleaves
Last updated About 1 month ago
Setting Up Your Cameras in Drawbridge
Before You Start
Before adding cameras to Drawbridge, you'll need two things:
Your camera's IP address —This is a number that looks like
192.168.0.2. You can find it inside your camera's app (e.g., ReoLink) or in your router's device list.Your camera's password — This is the admin password you set when you first set up the camera. For ReoLink, the default username is
adminand the default password is blank (no password).
Write these down before continuing you'll need them to build your connection string.
Step 1: Add Your Cameras to Drawbridge
In Drawbridge, go to your game's settings and find the Camera section
Click Add Camera
Give it a name like "Room 1" so you know which room it belongs to
Find your camera brand in the list below and copy the recommended connection string
Replace the placeholder values (anything in
< >) with your actual camera infoClick Test Cameras to verify there are no errors
Click Preview Cameras and view
What does a connection string look like?
It's just a web address that tells Drawbridge how to connect to your camera. You'll replace the parts in angle brackets with your real values. For example:
rtsp://admin:<PASSWORD>@<IP_ADDRESS>:554/cam/realmonitor?channel=1&subtype=1
Becomes:
rtsp://admin:mypassword@192.168.0.2:554/cam/realmonitor?channel=1&subtype=1
Step 2: Optional Settings
Audio — Some cameras let you listen in on the room. Check the Audio checkbox next to the camera to enable this. Note: this feature can sometimes cause the camera to freeze or crash, since it's not the camera's main function. Use it if you need it, but be aware it may be unstable.
Watermark — This option pins your camera’s name to the top right of it’s view on the Gamemastering Screen. This makes distinguishing between similar views much easier.
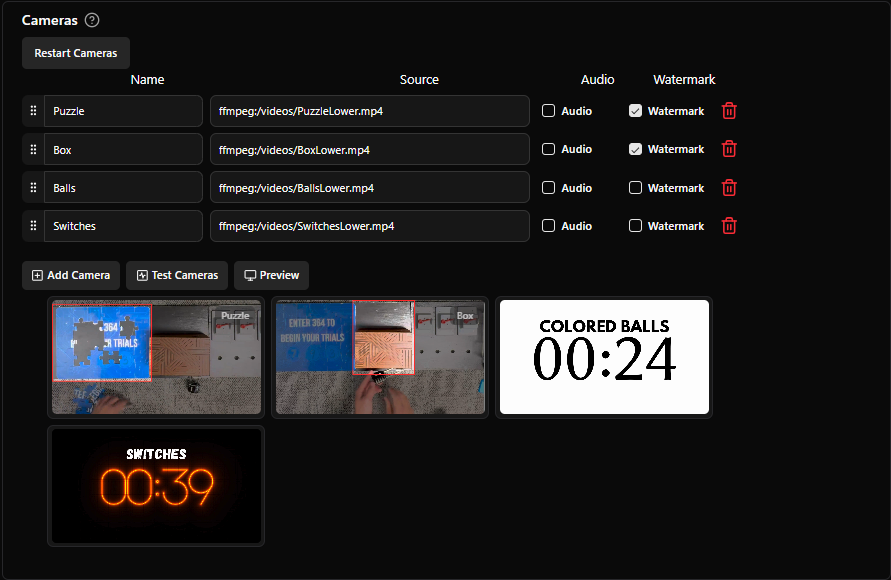
Delete a camera — Click the x at the end of the camera's row.
Main stream vs. substream — By default, Drawbridge uses a lower-quality "substream" to reduce network usage and prevent lag, especially on Wi-Fi. If you want full-quality video, you can switch to the main stream by changing "sub" to "main" in the connection string (or changing subtype=1 to subtype=0). Only do this if your network can handle it — it significantly increases bandwidth usage.
Camera Setup by Brand
Find your camera brand below. If yours isn't listed, email support@drawbridgesolutions.com and they'll add it.
Important for all cameras: Your camera must be set to use H264 video encoding (not H265/HEVC). H265 is not supported by Drawbridge. If your camera defaulted to H265, the setup instructions for your brand below will show you how to change it.
Amcrest
Amcrest cameras are standalone — they connect directly to your network, not through an NVR. No special settings changes are needed.
Recommended connection string:
onvif://admin:<PASSWORD>@<IP_ADDRESS>?subtype=MediaProfile001
Alternative:
rtsp://admin:<PASSWORD>@<IP_ADDRESS>:554/cam/realmonitor?channel=1&subtype=1
Cortex
Cortex cameras default to H265 encoding, which Drawbridge does not support. You must change the encoding to H264 before connecting.
How to change the encoding:
Log into your Cortex camera's web interface
Click Remote Setting (top right corner)
Click Encode (under the Recording section)
Click MainStream
Change "Video Code Type" from H265 to H264
Change Bitrate to 1024
If you want audio, make sure Audio is enabled
Click SubStream and repeat steps 5–6
Save your settings
Recommended connection string:
onvif://admin:<PASSWORD>@<IP_ADDRESS>?subtype=Profile_1
(Profile_1 = main stream. Use Profile_2 for substream.)
Alternative:
rtsp://admin:<PASSWORD>@<IP_ADDRESS>:554/rtsp/streaming?channel=01&subtype=0
(subtype=0 is main stream, subtype=1 is substream)
LaView
LaView cameras are standalone — they connect directly to your network. No special settings changes are needed.
Recommended connection string: onvif:
//admin:<PASSWORD>@<IP_ADDRESS>?subtype=Profile_2
Alternative: rtsp://admin:
<PASSWORD>@<IP_ADDRESS>:554/cam/realmonitor?channel=1&subtype=1
ReoLink
ReoLink cameras connect through an NVR (a small recording box). The IP address you'll use is the NVR's IP address, not the individual camera's address.
Step 1: Connect to your NVR in the ReoLink app
Install the ReoLink app on your phone or computer
Tap Add Device
Enter the IP address of your NVR (not a camera)
Log in — default username is
admin, default password is blank
Step 2: Configure the NVR settings
Tap the settings cog next to the NVR in your device list
Go to Networking > Advanced > Server Settings
Enable: HTTP, HTTPS, RTSP, and ONVIF
If you want audio, make sure Audio is enabled
Step 3: Set encoding to H264
Go to Settings > Stream > Stream Settings (the cog icon)
Set Encoding Format to H264
Step 4: Set your bitrate (fixes lag)
In the same Stream Settings screen, set Max Bitrate to 1024–2048 Kbps
Connection strings:
Recommended (HTTP FLV):
http://<IP_ADDRESS>/flv?port=1935&app=bcs&stream=channel{CHANNEL}_sub.bcs&user=admin&password={ADMIN_PASSWORD}
ReoLink channel numbers start at 0, not 1. If your camera shows as Channel 1 in the app, use channel0 in the connection string. Subtract 1 from the number shown in the app.
RTSP alternative:
rtsp://admin:<ADMIN_PASSWORD>@<IP_ADDRESS>/Preview_0{CHANNEL}_sub
RTSP uses the same channel numbers as the app (starting at 1). Use two digits — so Channel 1 = 01.
ONVIF alternative:
onvif://admin:<PASSWORD>@<IP_ADDRESS>:8000?subtype=0<CHANNEL>1
ONVIF uses the same channel numbering as HTTP FLV — subtract 1 from the app's channel number.
Ubiquiti UniFi UNVR
You'll need to manually enable RTSP for each camera in the UniFi interface.
For each camera:
Log into your UniFi NVR
Click UniFi Devices
Select the camera from the list
Click the settings cog in the camera sidebar
Scroll down to Advanced
Enable either:
High Resolution stream (set Max Bitrate to 1024 Kbps), or
Medium Resolution stream
Copy the link that appears
Paste it into Drawbridge, then make these two changes:
Change
rtsps://tortsp://Change
:7441to:7447Remove
?enableSrtpfrom the end
Example:
rtsps://192.168.0.2:7441/xVpmkpZdR25KbLaM?enableSrtp
Becomes:
rtsp://192.168.0.2:7447/xVpmkpZdR25KbLaM
HikVision
Step 1: Configure camera settings
Go to Configuration > Video/Audio
If your camera supports audio, set Video Type to Video/Audio
Set Video Encoding to H.264
Set Max Bitrate to 1024
Set Bitrate Type to Constant
Repeat these steps for each camera by selecting each channel at the top
Connection strings:
Main stream:
rtsp://admin:<PASSWORD>@<IP_ADDRESS>:554/Channels/301
Sub stream:
rtsp://admin:<PASSWORD>@<IP_ADDRESS>:554/Channels/302
Hikvision Network DVRs with Analog Cameras. Cameras may appear to connect successfully in Drawbridge with a blank picture. Ensure Stream Encryption is disabled by going to Settings > Network > Advanced Settings > Platform Access and unchecking “Stream Encryption.” This must be done directly on the DVR, it is not possible to disable it from the browser configuration page.
Troubleshooting
Note: Fisheye camera lenses are not fully supported at this time.
Still Need Help?
If you've gone through these steps and are still having trouble, the Drawbridge support team can remote in and help you get set up.
📧 support@drawbridgesolutions.com
Still need help? Share an idea