GameSense Features
A complete list of all features that are accessible with GameSense and how to set them up
Written By Emma Williams
Last updated About 1 month ago
LobbySense
Configure alerts for when customers enter the lobby, track how long customers have been in the lobby, and show live times on the camera feed for the lobby.
Configuration
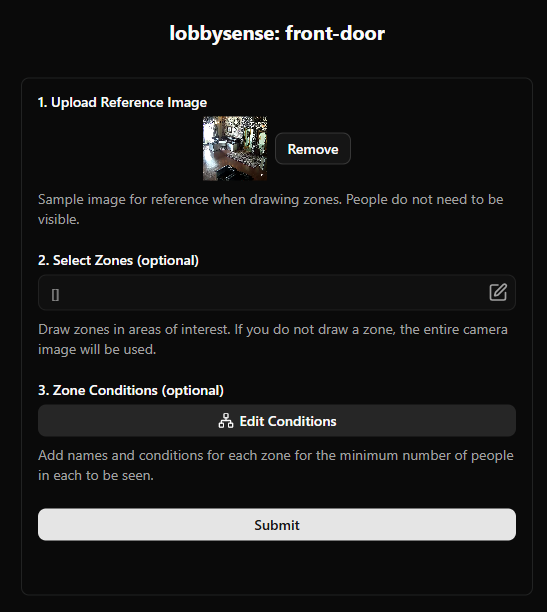
To configure LobbySense, you’ll need to go into Settings>Camera Settings>LobbySense. Create a new detection and select a camera that shows the lobby. For most locations, this is all you’ll need to do. If your lobby has photos of people or you’d like to only look for customers in specific areas of a camera feed, follow these steps:
Configure this detection by adding a reference image. You can upload this from your computer or use the “Collect Data” button on the right hand side to view the camera live and take a screenshot to upload.
Create zones of interest (where you’d like to look for customers). To do this, you’ll hit the edit button and then draw a box to create a zone. Boxes must start in the top left hand corner and end in the bottom right hand corner. If you’re only drawing one zone, you can proceed to testing.
If drawing multiple zones, you can name them and designate a number of people needed within a zone by hitting the “Edit Conditions” button. Clicking on a zone will allow you to configure it.
If you’d like to test your zone and make sure it is detecting people, you can hit the “Test Detection” button on the right hand side. This will bring up a live feed of the camera with the zone you drew and a number. Send a staff member in to stand in the lobby and watch the timer start!
Lobby Overlay
To view wait times for guests currently in the lobby or turn on alerts on a device, you’ll need to navigate to the Lobby tab.
To quickly see how long people have been waiting in the lobby, click the checkbox next to Overlay. This will draw a box around anyone in the lobby and tell you how long they’ve been in the room.
To configure alerts for people entering the lobby, you can click on the green icon seen below.
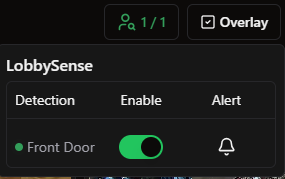
Here, you’ll see a list of detections, can turn them on/off quickly, and turn alerts on/off. Clicking on the bell will turn notifications on for the device you’re using. This means as long as the Lobby page is up, a person entering the lobby will cause an alert to appear in the bottom right hand corner.
Loss Prevention
Loss prevention allows you to use the cameras in your games to count players and verify the number of people in the game against the number of players in the booking for that game. The count occurs shortly after the start of the game.
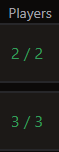
On the Overview screen, there will be a new column for players. This will either be red or green depending on if the number of people in the room matches the number in the booking. Clicking on the colored number will bring up a screenshot of players and draw a box around each person it has identified.
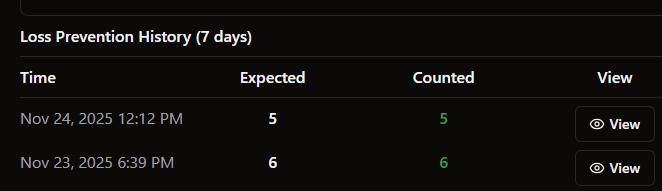
These photos are stored for 7 days in Loss Prevention History under GameSense in story settings. Any mismatches are also pulled in daily reports, so owners can look into them. Photos for this feature are captured during the ‘Prologue’ to a game, when players are watching their intro videos.
Configuration
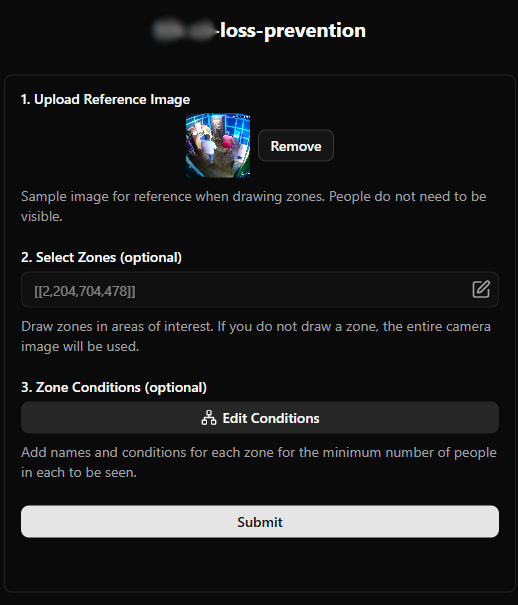
Config for this feature is done under Game Settings>GameSense>Loss Prevention. You’ll need to assign a specific camera to count players. Ideally, this is a camera that can see the entirety of room one. This is assigned with the “Trigger” button.
In most cases, all you’ll need to do is select the camera. If your game has photos of people on the wall, you may need to draw zones in which players will stand. To do this, you will hit the “Configure” button.
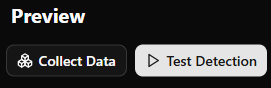
Once in the “Configure” menu, you’ll upload a photo from the camera. You can upload this from your computer or use the “Collect Data” button on the right hand side to view the camera live and take a screenshot to upload.
Then create a “Zone” which is the area in which players must be standing to be seen. Ideally this box will not include any photos of people, as that may confuse the count. The box must be drawn from top left corner to bottom right corner.
In “Zone Conditions” you can create multiple zones and name them. You can also set a minimum number of people in a zone.
If you’d like to test your zone and make sure it is detecting people, you can hit the “Test Detection” button on the right hand side. This will bring up a live feed of the camera with the zone you drew and a number. Send a staff member in to stand in the box and watch the number adjust!
Puzzle Completions
Puzzle completions are the original GameSense feature. This is using the cameras to determine when puzzles are completed, progressing the game without the game master needing to do anything. These puzzle completions can be used to check off objectives or trigger devices.
Puzzle completions can be trained by our team or by yours. If you’re interested in either, reach out to support@drawbridgesolutions.com and we can set you up with a tutorial course or a game walkthrough call!
Reset Scan
Recently added! Add reference images for what a correctly reset room should look like and flag areas to be checked after a reset is done. Setup info here!
Magic Moments
Under development, check back soon!
Goal is to automatically record moments from a game and compile them into a highlight reel for players.